Since Michael and I are moving into our new house (5 more days!), I’m spending way too much time on Pinterest and trying to rationalize purchasing every single cute home decor thing I can find. The other day I ended up with a cutesy doormat in my shopping cart when I realized I was about to spend $50 on a doormat. Considering we’re currently putting aside money for a new mattress, headboard, and roman shades for the house…the last thing I needed to do was spend $50 on a doormat. But see, I knew I didn’t NEED it…but I wanted it. My new house needed a cute doormat. It was very important. (Welcome to the inner dialogue of my brain).
Then, as I stared at this $50 item in my shopping cart I thought to myself, “well, come on, I could make that!” And that’s just what I did.

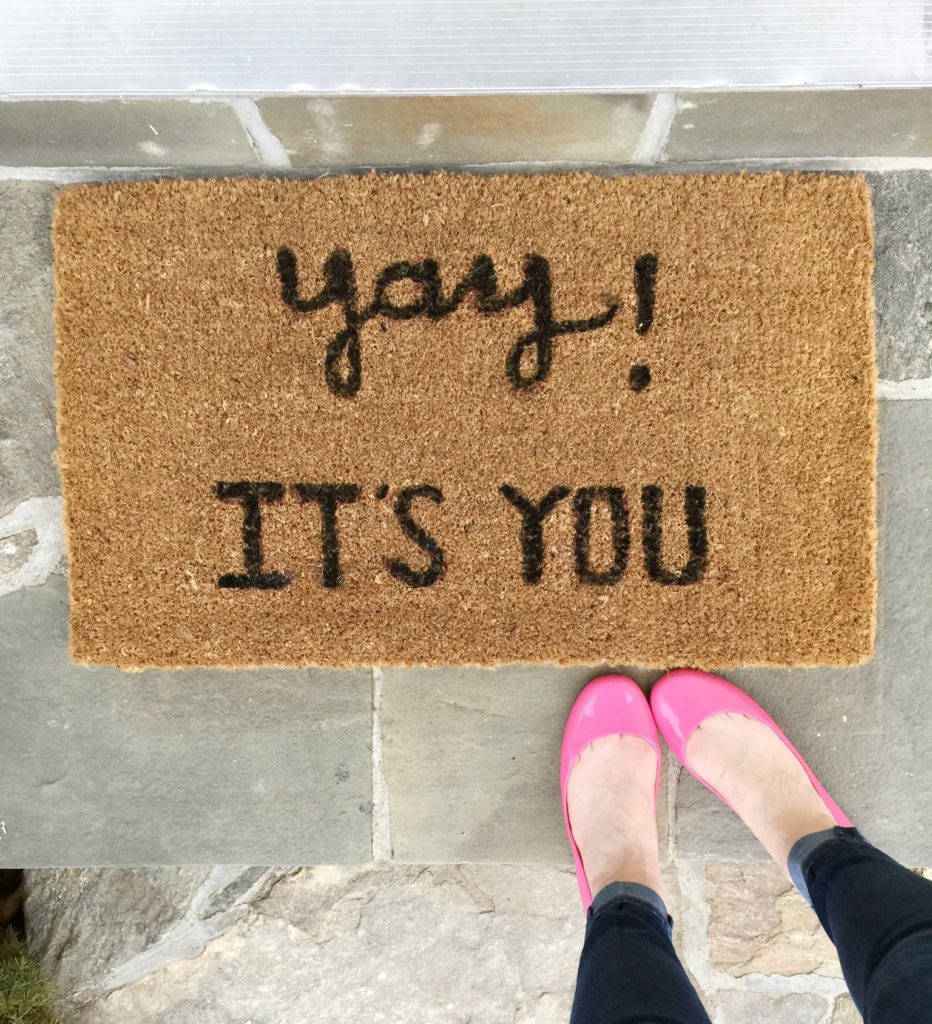
I’m going to show you how to make your own DIY welcome doormat, just like I did. These lettered doormats are all over right now from your Instagram feed to Pinterest. You can get them in all sorts of adorable sayings. Most of the welcome mats I looked at with this style were between $35-$50 with around $8-$15 for shipping! I made my doormat for just under $15. Think of all the coffee I can buy with the $35 I saved.
I love the way my DIY doormat came out. And, I’m actually glad I was “forced” into DIYing it so I could decide exactly what I wanted it to say.
How To Make a D.I.Y Doormat

Step One: Get a plain doormat
To get started, you need to get a plain, natural doormat. They range in price but, in general, are between $8-$12. You can get this $10 one from IKEA. Make sure you let your dogs inspect it thoroughly when you bring it home. (Austin and Zoe obsessed over mine for about twenty minutes for some reason.)

Step Two: Sketch it out
Once the dogs had their share, I laid out some newspaper to the size of the mat. I used this to get an idea of how I wanted to lay out the letters on my mat. This gave me the chance to sketch it out a few times to make sure I liked the way it looked.
TIP: Make sure to create a sketch that gives you decent space between letters/words to ensure there isn’t any overlap when you go to paint.

Step Three: Map it out
Once I had the letters the way I wanted, I used some painter’s tape to map out boxes for each word. I also marked out the space for each individual letter on the masking tape to act as my guide.
Next, I lightly penciled in the letters using a marker. I was comfortable doing this freehand since it was a very simple design. But, you could also buy a stencil or copy from a printed design.

Step Four: Paint away!
I used a cheap $0.99 paintbrush and a small 1/2 pint of black exterior paint to paint. The letters on the bottom were easy since they were basically all straight lines. I used a stippling motion to get as much paint into the doormat as possible. I used basically the same technique for the “yay” portion – but just went a little slower since it was more curved.


Step Five: You’re done!
Simply let the paint dry and remove the painter’s tape and you’re finished.
You can write just about anything you want on your doormat. I’d just make a suggestion to not make it too long as you can’t get your letters super tiny if you’re going the freehand painting route like I did here. I’d stick with something under 25 characters.
Seeing as I’m always excited if someone comes to visit me, this seemed like the appropriate saying for my doormat.


Zoe won’t let you in if you don’t know what the secret password is.
Hint: It’s “biscuit.”
If you re-create this, don’t forget to share with me using #butfirstcoffeeDIY