
Well hey there my friends. Today I have some basic makeup dos and don’ts for you. I was inspired to do a back to school makeup look, but seeing as I’m not exactly a student anymore (wahh! bring back the keg stands and frat parties – LOLZ jk, I never went to a frat party or did a keg stand) I wanted to spice it up a little.
For the past two years, I’ve worked in high school and middle school. This experience of seeing the makeup girls wear now paired with the makeup I used to apply, has made some very common makeup mistakes obvious to me. So, what I have for you today are the top 10 makeup mistakes I see.
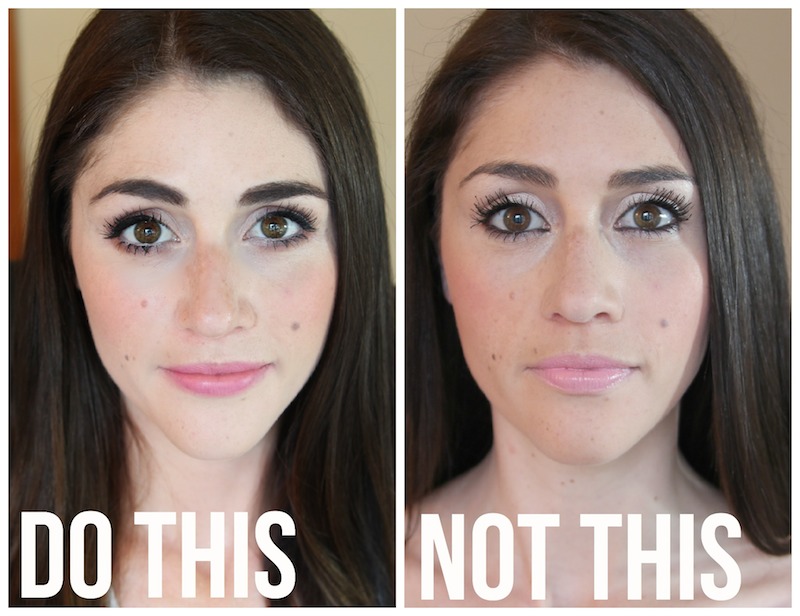
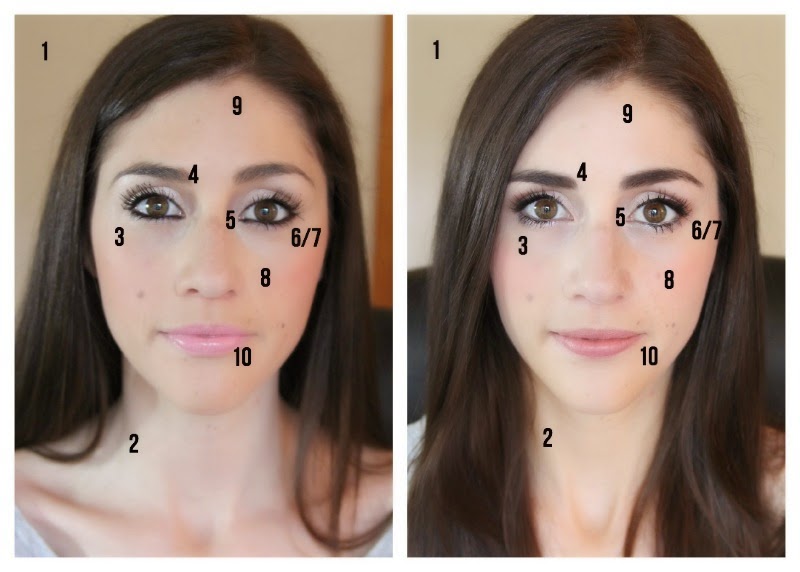
While this was inspired by back-to-school, I’ve seen all of these mistakes made by grown, professional women. So, even if you’re not a student anymore, you just might benefit from giving this a quick peek. I’ve created a quick, simple video showing you each mistake and how to fix it – I’ve also included an all text version below for my friends who prefer to read.
MISTAKE ONE:
Not exfoliating and moisturizing your skin prior to makeup application.
Trying to apply your makeup to dirty or dry skin is just going to end badly, trust me. Makeup sticks to dry patches and applying to dirty skin can leave to uneven application and even breakouts in the long run.
Fix it: Take the few extra minutes it takes to quickly exfoliate your skin with exfoliating pads like these, or just using a exfoliating cleanser (my favorite is this one). Then, follow up with a daytime moisturizer. I love the Paula’s Choice BHA Lotion which helps prevent dryness in the first place.
My Skincare Favs:

Mistake Two
Not blending your foundation.
This is BY FAR the most common foundation mistake I see. It’s easy to apply foundation properly to the parts of our face we naturally see in the mirror and forget about blending.
Fix it: You want to take your foundation all the way back to your ears, up into your hairline, down your jaw and onto your neck to avoid any makeup lines. Using damp beauty blender is the best method for this as it is designed to replicate real skin and helps the foundation blend seamlessly while also preventing you from applying too much makeup.
Mistake Three
Caking on concealer.
Sometimes, less it more. It’s true if you’re going for a full coverage makeup look, taking a thick amount of concealer in a big triangle shape can be great, but for everyday looks, it’s just going to make you look cakey and won’t help brighten the face.
Fix it: Take a liquid concealer and look into a mirror dead on. Then tilt your head slightly down while still looking into the mirror, you’ll see that your darkest under-eye areas will become more prevalent. Just apply concealer here, this is the only place you really need it.
My favorite under eye concealers:
Mistake Four
Neglecting eyebrows.
Poor eyebrows, always so neglected. A well-done eyebrow can make a face pop, so don’t leave them out. On the flip-side, of course, don’t over do it either.
Fix it: Using a pencil (or powder & angled brush) in a shade one shade lighter than your natural eyebrow, fill in the gaps in your brows. See my eyebrow tips.
Mistake Five
Applying a light, shimmery shade all over the lid.
Don’t get me wrong, I love a champagne-colored shadow, but applying it all over gives your eye shape zero dimension.
Fix it: A light shimmery color is great to apply on the inner 1/3 of your eye, but try packing on a matte brown on the outer 2/3 and softly blending it into your crease. This gives your eyes shape and opens it up.
Mistake Six
ALL THE BLACK EYELINER!
This is such a common mistake and I used to make it myself all the time. Something in our mind tells us loading on the black liner all around our entire eye makes our eyes look better, but in reality, it just looks too harsh and actually makes your eyes look smaller.
Fix it: Now, I’m not saying to put away your black liner -that would be a tragedy- let’s just not put it everywhere. Try using a white or nude liner on your waterline (that’s the bottom lash line). This opens your eyes up. Then take black into your tight line (inside of your upper lash line) and on your lid along the lash line. If you want to get more dramatic here, then go for a thicker line.
Mistake Seven
Too much mascara.
Have you ever seen the woman who applied so much mascara she basically only had 3 lashes left? Not sexy.
Fix it: When applying your mascara, softly wiggle the brush back and forth in order to coat each lash and prevent them from sticking all together. When any clumping begins, you’ve got enough on, stop while you’re ahead.
My favorite mascaras
Mistake 8
Going too heavy with the blush.
I totally understand this mistake, because blush is usually my favorite step. It just makes my skin look so alive! But, there are benefits in controlling your excitement.
Fix it: Blush, in general, shouldn’t go too close to your nose nor should it go too far below your nose – bringing blush too low can make your face look droopy. Taking blush on your brush, give a big smile and find the apples of your cheeks. Apply the blush here and then sweep it back towards the top half of your ear.
Mistake Nine:
Over-powdering your face.
This is a common mistake for ladies with oily skin because they want to make sure to control shine all day. The problem is over-powdering can make your skin look dry and too matte.
Fix it: Be more purposeful with your powder application. Sweep it only where you need it most (where you get oily, such as your t-zone). If you worry about makeup smudging off during the day, try finishing with a makeup setting spray (such as Urban Decay’s De-slick) which will prevent this without making you look dry.
Mistake Ten
Applying too light of a lip color
There is nothing wrong with light lips, but they aren’t always the best choice. I assume many girls think light lips are a more “safe” choice than a bright color, but they run the risk of washing you out.
Fix it: Don’t be scared of color. Pick a lip color that’s good for your skin color (check out my Choosing the Right Lipstick Color post for help) and try patting it on your lips and rubbing it in with your finger. This gives your lips a tint of color without over-doing it and brightens up your face instead of washing you out.
: